Arepas rellenas – Venezuelan corn cakes – are the perfect food. They’re filling, delicious, and easy to make.
And this Venezuelan-Style Stuffed Arepas recipe is the best version yet!
I love how these arepas taste – they’re stuffed with a savory stuffing that will have your mouth watering. And of course, there’s always room for dessert when it comes to arepas!
What is an arepa?
The Venezuelan-style stuffed arepa is a type of cornmeal cake that is popular in Latin American countries. Arepas are thicker and often sliced like a bun. They are made with white or yellow cornmeal, water, and salt, and are thenfried or grilled. Arepas are gluten-free and traditionally served as a main dish or snack.
What is the difference between arepas and other types of bread?
- Arepas are a type of cornbread that is gluten-free and traditional to Venezuelan and Colombian tables.
- Arepas are thicker than the types of bread found in Colombia and often sliced like a bun.
- The difference between arepas and other types of bread is that arepas are made with cornmeal, which is commonly substituted for bread dough.
- Arepas are light, fluffy, and fluffy in texture.
- They lack softness and have a gooey center.
- Tortillas are often black on the outside when they are hot and have turned black.
- Arepas are a type of maize-based bread that is usually cooked on a griddle or in the oven.
- Other types of bread can include wheat, rye, spelt, and kamut flour varieties.
- Some other key differences between arepas and other types of bread include that arepas are denser and often have a slightly sweet flavor, while other types of bread generally do not contain sugar or starch.
How to make this Black Beans Dish?
Step 1: Gather the ingredients
Corn flour
fresh corn
avocado
jalapeno
olive oil
black beans
red onions
queso fresco, cojia, or feta cheese
optional: ground beef or shredded pork or chicken.
Step 2: Prepare the arepas
To make Venezuelan-style stuffed arepas, you will need 4 ingredients: water, salt, oil and corn flour.
To make the dough, whisk together the salt and arepas corn meal, and gradually add warm water into the centerl and stir with a wooden spoon until a dough forms.
Knead the dough a few times and then flatten into discs using your hands before frying on a griddle or frying pan. The dough for Venezuelan-style stuffed arepas needs to be soft but also hard.
Step 3: Fill and stuff the arepas
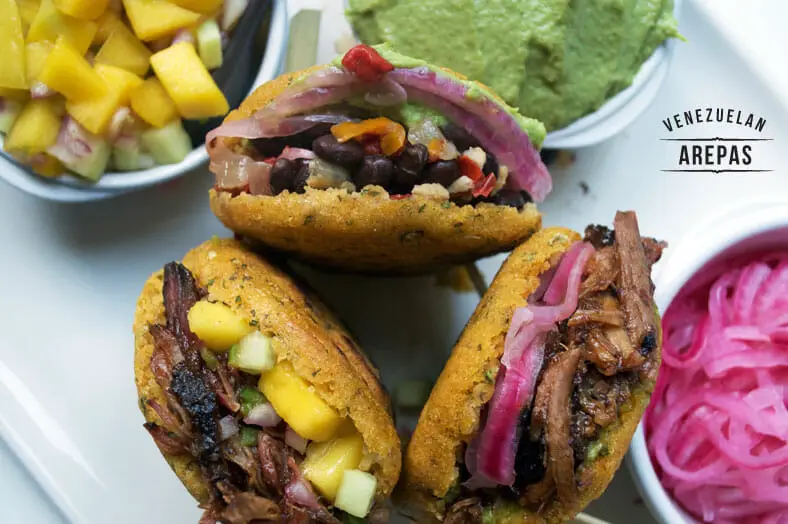
Split the arepa and add filling like you would a taco. Add your filling of choice – black beans, corn, cheese, and optional meats, if using. At this point we’re putting the filling in like this was a taco. The best cheese for these Venezuelan arepas is quesco fresco, but you can also use cojita or feta cheese.
Step 4: Fry the arepas
Sear the arepas for 3 minutes on each side or until they are golden brown.
Place in oven for 15 minutes at 380 degrees. Serve immediatley.
What fillings can I use for my arepas?
Cheese
Ham
- Chorizo
- -Serrano
- -Pork Jamón Ibérico
- -Ham Steak
- -Smoked Ham
Bacon
Sausage
- -Chorizo sausage
- -Pork sausage
- -Beef sausage
- -Chicken sausage
Other Filling options:
-Shredded chicken vegetables such as onions, peppers, and carrots, can be put in chorizo sausages. These can also be topped with cheese or salsa.
-Ground beef can be used to make arepas stuffed with shredded beef and vegetables like onions and peppers. Salsa or cheese can also be added for flavor. This is a popular option at most Venezuelan restaurants.
-Arepas stuffed with mashed potatoes are a great option if you’re looking for something hearty but not too filling. Try adding different types of cheeses or vegetables to the potatoes before stuffing them into the arepas dough.
5. Chorizo
6. Peas
7. Spinach
9. Guacamole (Avocado)
10. Fresh shucked and then grilled corn
FAQs
Do you eat arepas with your hands
Yes, eat it like it’s a taco!
What is the difference between arepas and other cornmeal cakes?
- Arepas are made with a type of corn flour that is fried and then baked
- Arepas are thicker than other cornmeal cakes, and often sliced like a bun.
- Venezuelans and Colombians have different variations on arepas, which makes them even more unique from one another.
What is the origin of arepas?
The Venezuelan version of arepa is thicker and filled with different ingredients, while the Colombian version is thinner and flatter. The Colombian arepa is often topped with ingredients to create a sandwich or tostadas dish, while the Venezuelan arepa is eaten as a breakfast food. The origins of the Venezuelan and Colombian versions of arepas lie in early 15th century occupation by Spanish settlers. Arepas are a type of cornmeal cake that are popular in Latin American countries. Arepas rellenas are typically filled with cheese, meat, or vegetables and are served as a main dish or snack.
Scroll down to read the full origin story,
Storage for Arepas
Arepas rellenas are a great dish to have on hand, but they can be tough to store. They tend to get soggy if left in the bag and become difficult to eat if stored for too long.
To store arepas rellenas, put them into an airtight container with lid or plastic wrap-dampened paper towel.

Even when comparing apples to oranges, it’s still a debate very much going strong.
Arepas, The Timoto-Cuica and Gran Colombia
Before diving deeper into “the split,” we’ll first go back a little further and see where exactly arepas came from.
To do that, we’ll need to go back to the Pre-Columbian era of South America.
The Timoto-Cuica
Prior to Christopher Columbus’s expeditions in 1492 that discovered the “New World” – and introduced significant European influence to the Americas – South America was home to a vast array of different civilizations and societies. Depending on where you look, the number of indigenous inhabitants ranged anywhere from 30 million to 100 million by the time Columbus first set sail.
Here we won’t re-hash the decimation of these South American indigenous peoples following the explorer’s arrival (you can find a good primer here), but the history of arepas is very closely linked to a smaller Andean population in what is now western Venezuela: the Timoto-Cuica.
Relative to the other indigenous Andean tribes, the Timoto-Cuica had developed some of the most advanced agricultural methods to improve crop growth. Through the use of tactics like field terracing (to avoid erosion), irrigation ditches and water storage, the Timoto-Cuica could very effectively grow a multitude of crops like corn, potato, cassava and cocoa. Couple these crops with the domestication of animals like turkeys, and the Timoto-Cuica developed a fairly diverse diet.
One of the popular staples in the Timoto-Cuica diet was the erepa, an unleavened cake made from dried and ground corn. And while the concept of unleavened cakes like this were not uncommon for other Amerindian groups – nearby Arawaks (whom we saw in Jamaica) made a similar unleavened cake called casabe – the Timoto-Cuica erepa uniquely used corn where others used cassava.
Alas, the onset of the Columbian era drove the Timoto-Cuica to a tragic extinction, but their legacy remains strong in arepas… even though times of fierce political turmoil.
Fracturing from Gran Colombia
By the mid-16th century, the Europeans had arrived and conquered – both politically and economically – much of the South American landscape.
Save for a brief stint of German occupation, the Spaniards were the driving colonizing force in the northern parts of South America. For Venezuela in particular, the Spanish cultivated its lands and built up a thriving cocoa industry that brought the area to prominence. Coupled with an easily accessible port and contact with both European and Caribbean traders, the city of Caracas grew into an intellectual and commercial hub for the entire region.
Nevertheless, the Venezuelans strongly sought independence from the Spanish Empire. The early 19th century brought a turn of luck in this respect, as the Spanish Crown was badly weakened by the Napoleonic wars being fought back in Europe.
The Venezuelan provinces capitalized on the opportunity and in 1811 declared independence from Spain. It would take a decade and several failed Venezuelan Republics (and corresponding Spanish reconquests), but eventually Simon Bolivar – the lead commander in the independence movement – won in battle at New Granada and established the sovereign state of Gran Colombia.
At its outset, Gran Colombia was a massive newly sovereign territory. While Gran Colombia itself only lasted ~15 years, at its peak it encompassed what is now the modern states of Colombia, Ecuador, Panama, Guyana, parts of Brazil, northern Peru, and of course Venezuela.
The political situation of Gran Colombia worsened after the initial euphoria, as clashing groups of federalists and separatists had differing visions on the future for the region. Despite Bolivar’s best efforts (including naming himself dictator) to keep the union alive, Gran Colombia officially dissolved in 1831 as Venezuela and Ecuador split and became independent states.
This political rupture proved to have a huge effect on the trajectory of arepas, which now became popular in both Venezuela and modern day Colombia in entirely different ways.
Colombian vs Venezuelan Arepas
Most (including us) will immediately associate arepas as a typically Venezuelan snack, but we’d only be half right.
Stemming from the time of early 15th century occupation, the Spanish adopted the Timoto-Cuican erepas, and it quickly became ubiquitous throughout the region. Following the fracturing of Gran Colombia, arepas grew and flourished in two countries in particular: Venezuela and Colombia.
The two versions of arepas have very little in common with one another these days. Colombian arepas tend to be thinner and flatter, and their accompaniments often top the arepa to create more of an open-faced sandwich or tostada type of dish. Most often the arepas are then eaten as a breakfast food in Colombia.
The Venezuelan versions, on the other hand, are completely different. They’re made to be shorter, thicker and often stuffed with various different and colorful ingredients like a traditional sandwich. Depending on how these arepas are prepared – sometimes they’re fried, other times they’re grilled – they are sometimes enjoyed most after a fun night on the town.
While we didn’t paint the town red ourselves before this recipe, we loved the color and variety of arepas rellenas (stuffed arepas) so much that we had to pursue further.

About the Recipe
For the actual corn cake itself, there’s very little that goes into creating the dough. Traditionally, you would want to grind dried corn down into a rough, not-so-fine meal, but nowadays you can use granulated cornmeal or masarepa flour to make your arepas.
The beauty of the arepa is how flexible and versatile it is. You can make your dough with as little as added water and salt, or you can even sneak small bites of flavor like fresh herbs if you like. It’s completely up to you.


After mixing and mashing your dough until it becomes thick and sticky, you’ll take a portion of your dough in your hand and roll it into a ball.
Once you have a nicely formed ball, you’ll want to press it down on a flat surface with even pressure to help it flatten into more of an ovular disc shaped. You’ll want to be careful here, though, since the outer edges of your disc might want to crack. Don’t let them.


After you’ve gotten all your discs prepared, you can do all sorts of things to your arepa. You can grill them, sear them, bake them, deep fry them… or a combination of any of the above! It’s completely up to you, but you’ll want to budget at least a good 10-15 minutes of cooking time.
 until they start to brown")
As you’re cooking, you can prepare your various toppings and sauces for your arepas. One sauce in particular we can suggest is guasacaca, or a zestier, tangier Venezuelan version of guacamole. To make it, simply blend ingredients like avocado, onion, lime juice and jalapeno (and more if you’d like) together until smooth and almost runny.
With your arepas done, take them out of the oven and cut them open. Stuff them with as many fillings as you’d like, drizzle a nice helping of sauce on top, and enjoy!

Our Take on the Recipe
It’s clear that people take pride in making great arepas. For us, we grew partial to one site in particular with their approach to arepas and their walkthrough of the process, which is why it’s our original reference recipe for today.
While we didn’t make any major adjustments to the key ingredients in their arepas, we did make some additions. To give the arepa itself some added flavor, we added chili powder, scallions and finely chopped cilantro into the mix. To add a bit of a crunch to the bite, we added in some freshly cut corn from the cob. Keep in mind, though, that all these ingredients are totally optional.
We added guasacaca to the root recipe even though it’s not part of the arepas themselves simply because we found it goes so well with any filling ingredient. You’ll notice, however, that we didn’t mention any ingredients for the filling. If we did, the recipe would be never-ending because the possibilities for arepas are limitless, but do keep in mind that you’ll need some tasty assortment of colorful fillings for true arepas rallenas.
Otherwise, the arepas themselves are so incredibly straightforward, and they help provide a meal experience that is enjoyable at any time… whether you’ve just come home from a party or not.
Enjoy!
What would you fill in your arepas? Comment below!

Food plated and styled by Phil Roepers
Great background research!
Thank you
My children love theirs with fresh white cheese
I love mine with ‘perico’ (if hash and scramble had a kid)
And my husband loves them ‘pavellon’ stewed shredded beef, black beans, white cheese, and sweet pan-fried plantains
Thank you Norely! Love the idea of both white cheese AND perico in arepas. I’m personally a pretty big fan already of the pavellon too 🙂